Hey there, golf enthusiasts! So, you’re tired of waiting for perfect weather or want to squeeze in a few swings after work? Well, guess what? You can now bring the green right to your living room with a budget-friendly golf simulator installation. Imagine turning any room in your house into a teeing ground without breaking the bank. Intrigued yet? Let’s chip into the details and see how you can get your home course set up without burning a hole in your pocket!
Read Now : Advanced Golf Swing Accuracy Assessment
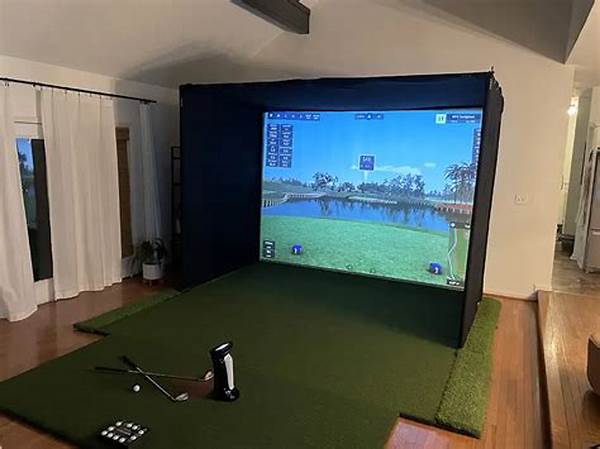
Splurging Without Splurging
Who knew you could indulge in your favorite sport without a country club membership? With a budget-friendly golf simulator installation, the key lies in clever investments. These simulators can range widely in price, but with some smart shopping, you can keep costs down. Start by considering basic models that offer all the essentials—like realistic graphics and accurate swing analysis. You might miss out on some high-end features, but trust me, the thrill of virtual golfing remains absolutely satisfying. Moreover, space is another place to save. Opt for a foldable setup or choose a portable screen that can be tucked away when not in use. Pair that with your golf mat and a budget-friendly net, and you’ve got yourself a solid start. This setup not only respects your bank account but keeps your significant other happy with the space-saving prowess!
Affordable Components for Installation
1. Opt for Used Equipment: Explore second-hand markets or online platforms. You might find reliable golf simulator gear that’s easy on the wallet.
2. DIY DIY!: DIY setups can drastically cut costs. Build your screen or frame, and use budget-friendly resources for your budget-friendly golf simulator installation.
3. Projector Picks: Choose a projector with good lumens but decent pricing to achieve crisp visuals without splurging. Compatibility is key for your budget-friendly golf simulator installation.
4. Affordable Software: Seek out software that offers a balance between cost and features. Many programs provide realistic experiences without extravagant fees.
5. Utilize Existing Tech: Use a tablet, smart TV, or phone you already own to sync with the simulator software, cutting down on additional costs.
Hassle-Free Maintenance Tips
Once you’ve nailed the budget-friendly golf simulator installation, the next step is keeping it running smoothly. You don’t want your investment falling apart as quickly as it was put together, right? An easy trick to maintain your simulator is keeping it clean and dust-free. Regular wipe-downs of the screen and projector will go a long way in preserving image quality. Even those simple DIY-built frames need love—tighten and secure them regularly to ensure everything stays in position. When it comes to software updates, make sure you’re keeping your system up to date. Upgrades can enhance the simulator’s overall performance without costing you a dime. And don’t forget the perks of subscription models that keep your software fresh at a budget-friendly rate.
Read Now : Cushioned Golf Bag Straps For Older Adults
The Long-Term Benefits of Investment
Investing in a budget-friendly golf simulator installation has more perks than one might guess. Apart from the obvious weather-proof practice sessions, you gain convenience and flexibility without persistent greens fees. Over time, the initial investment pays off through endless practice and skill boosts. The comfort of your home turns into a driving range, allowing for spontaneous practice any time you can sneak it in. Think of it as setting a little golf sanctuary at home—a place where you can unwind, improve your swing, and maybe even get the family excited about golf. With time, the simulator can become the go-to place for mini-family tournaments, fostering memorable moments without the hefty expenses of a golf trip.
Maximizing Your Space
Transforming your space into a golf haven doesn’t have to be elaborate. With a budget-friendly golf simulator installation, you maximize space and minimize clutter without sacrificing fun. Identify a room or even a garage corner to set up shop. Make sure it’s wide enough for a full swing and has decent ceiling height. Keep it simple but effective—enough to accommodate your virtual gaming and creative vibe. Clever storage solutions or fold-away elements can keep the space multipurpose. You’ll soon have a dedicated zone for practice and relaxation that uniquely fits your home dynamics, proving that budget-friendly golf simulator installation is indeed a rewarding choice.
Practical Aspects of DIY
Keen on assembling a budget-friendly golf simulator installation yourself? The DIY route can be both fun and rewarding. Start by drafting a plan of your intended area, detailing your component placements. Gather materials needed for crafting your screen, frame, or even player enclosure. Not only does this approach save costs, but it also gives a personal touch to your simulator. Be sure to research easy build guides or seek online golfing communities for insights. With patience and creativity, you can achieve a competitive setup with personal flair and high satisfaction.
Wrapping It All Up
To sum things up, a budget-friendly golf simulator installation is all about savvy decisions and a sprinkle of creativity. By opting for used equipment, leveraging existing technology, and considering DIY methods, you can build an impressive golfing setup without causing financial stress. Maintaining it with regular check-ups and updates ensures it stays in prime condition, giving you endless enjoyment and practice time in the comfort of your home. Embrace the countless hours of golfing joy ahead—all made possible through thoughtful planning and budget-conscious choices.