Alright folks, if you’re an avid golfer stuck at home and craving that sweet swing practice, building your own DIY golf simulator is like having your golf cake and eating it too. It’s perfect for rainy days or when you simply can’t head to the greens. Grab a cup of coffee, sit back, and let’s go through some easy DIY golf simulator installation tips. You’ll be a pro at setting things up in no time!
Read Now : Weather-appropriate Golf Attire
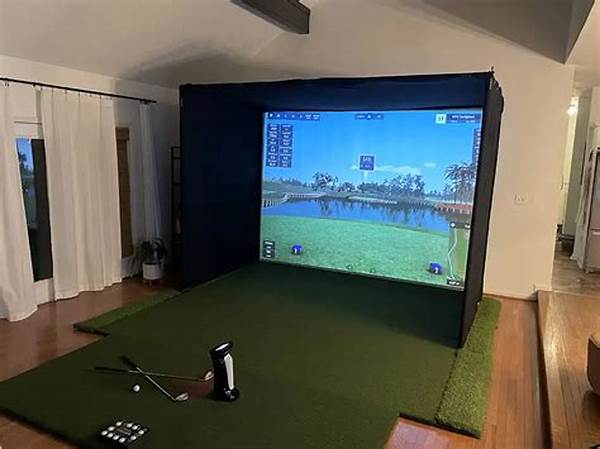
Setting Up Your Space
Creating the perfect environment is essential to enjoy your new toy to the fullest. Start by scouting a spot in your home where you can freely swing a club. The basement, garage, or even a spare room can be ideal spots. Make sure you have ample height, around 9-10 feet, so your driver doesn’t hit the ceiling. Length and width are also crucial. A good rule of thumb is having at least 12 feet of length and about 10 feet of width. Once that’s figured out, you can start envisioning where everything will be positioned.
Now that you have your spot, think about the flooring. You’d want something that closely replicates a golf course feel. Options like artificial turf or thick mats work wonders and provide that necessary cushion. Lighting is yet another key factor; you don’t want to be squinting midway through your swing! Bright, balanced lights work best, ensuring you can see every virtual grass blade. Starting off with these DIY golf simulator installation tips will set you on the right path to creating an incredible at-home experience.
Equipment Essentials
Getting started might require a bit of shopping, which is always the fun part! You’re going to need a projector and screen. Make sure the projector has enough lumens for a bright image, even in a well-lit room. The screen, meanwhile, should be a hitting screen that won’t tear easily. Next, you need a launch monitor, the heart of your simulator setup. It tracks your shots and gives you that essential feedback.
Simulation software is another piece of the puzzle. Whichever software you choose, from budget-friendly options to pro-level ones, ensure it’s compatible with your monitor. Then, consider netting or curtains to keep those wayward balls from causing damage—safety first! Having the right gear is critical, and these DIY golf simulator installation tips can help you find everything you need on any budget.
You’ll also want speakers to enhance the experience with crisp sound, as well as a computer or device that can run the chosen software smoothly. Invest in a stand or enclosure for a clean, professional look. Once your equipment list is complete, the real fun of setting it up and testing it begins!
Installation Process
Now for the nitty-gritty! First, start by hanging up your impact screen. If you’ve bought a kit, follow the instructions closely. Ensure it’s secure enough to handle high-speed hits. Next, position your projector correctly. The struggle of adjusting the projector until it lines up perfectly with the screen is absolutely real, but it’s also rewarding!
When aligning, take into account the distance and angle to avoid shadows and distortion. Hang or mount the netting or curtains, paying attention to any areas where a stray shot might escape. Follow this with setting up your launch monitor and testing it to ensure accurate data tracking. With the help of these DIY golf simulator installation tips, you’re well-equipped to manage this task methodically.
Finally, connect your computer and install your golf simulation software. Check that everything is synced and set up, with the screen mirroring what’s on your computer. Do a test run, tweak as necessary, and soon you’ll be swinging like you’re on your favorite golf course, but from the comfort of your home. Enjoy the fruits of your labor as you dive into this new personal golfing zone!
Real-Life Experience
Nothing beats learning from someone who has been through the process. John from Ohio shared his experience last summer on a forum. After months of tweaking and adjusting, his final setup could rival a professional simulator. His top DIY golf simulator installation tips included double-checking every alignment point twice and ensuring your internet is fast enough for software updates, especially when you have friends over.
Another golfer, Sarah from California, swears by the power of patience. Assembling the various components was a weekend project, peppered with moments of frustration when things didn’t fit initially. Her advice? Invest time in watching tutorials online and joining communities for advice. The satisfaction of finishing it all, she says, is beyond worth it.
Read Now : Motion Sensor Golf Equipment
And a tip from Mike, who had an epiphany one night, realized that adding a data cable instead of relying on Wi-Fi reduced lag significantly. His setup feels smooth and seamless, just like being on a real course. All these personal stories show that, while the setup process can be challenging, the results are well worth it.
Calibration and Practice
Once you’re all set up, calibration becomes your new best friend. Take time to ensure all data points align accurately. Launch monitors should give consistent feedback across different clubs. Dial in those settings so when you hit with a 7-iron, you get exactly the data you expect. With these DIY golf simulator installation tips, you’ll understand the nuances of your equipment quickly.
Begin with short clubs and work your way up. It’s crucial to get a feel for how your simulator reads each one. Once calibrated, start practicing. Even in a simulator, practice builds consistency. Stay disciplined, and soon you’ll see those improvements translate on the actual golf course.
Another essential component is setting goals for each session. Focus not only on your swing but also on other areas like putting and chipping. With dedication, your simulator will become the ultimate practice partner. New skills will be acquired, translating into better performance on a real course in no time.
Conclude with Some Play
After all that setup, it’s time for some fun! Challenge yourself with a few rounds at famous courses around the globe. These simulations are often stunningly accurate and let you experience what playing at coveted courses is like without the travel expense. It’s a delightful end to your DIY golf simulator installation journey.
Invite friends over for some virtual golf. Friendly competition can make the game even more engaging, plus, sharing your new setup with friends is always gratifying. You get to revel in your work, show off those impressive new golf skills, and offer them some of the DIY golf simulator installation tips you now know like the back of your hand.
Whether you’re sharpening your skills or just having some fun, this golf simulator is sure to provide endless hours of entertainment. Enjoy every moment on your personal virtual fairway, and hit them long and straight!